Waeco CoolPower RAPS36 – 3 Modifications to improve the functionality of your battery (including replacing the Batteries)
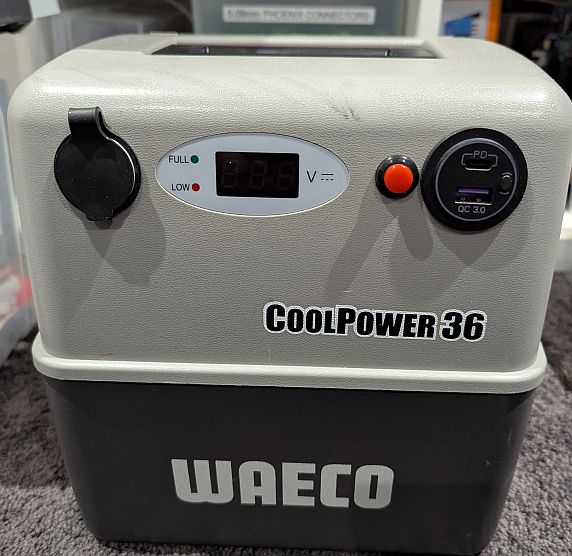
The Waeco CoolPower RAPS36 Battery box is quite common in Australia, with the unit being a common purchase with the Camping Fridges. Many of them are getting older and could do with a bit of modernisation. Here are some upgrades I have made to mine.
The following is at your own risk. If you aren’t confident doing some basic electrical work, then I suggest finding someone to give you a hand with these skills. Most of what is included in this guide is quite simple, and so long as you take suitable precautions, particularly when replacing the batteries.
Each section includes the tools you will need to perform that task so you can be prepared. I would recommend reading through each section entirely before performing the change, so you can full understand what needs to be done, and be prepared with the correct tools.
Opening the Enclosure
What you will need • Long Number 3 Screw Driver (to open enclosure)
Turn the Battery upside down.
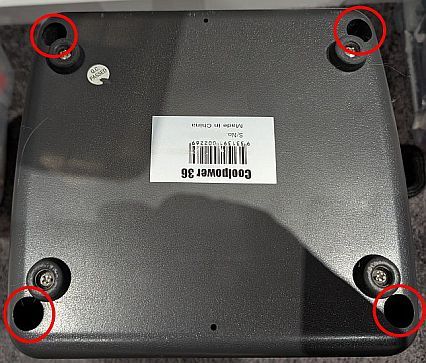
Using a Number 3 Philips screw driver, unscrew (but don’t remove) the 4 screw on the bottom. You will likely need an extra long driver for this as they are quite deep.
Once loose, carefully tip the battery unit back up the right way, as the lid will come free now, and watch for the screws.
Hinge up the lid towards the back – battery wires can be a little stiff, but it will fold back

You now have access to perform the following upgrades.
Replacing the batteries
What you will need:
- 6 x 6mm Yellow Ring Crimps (https://www.altronics.com.au/p/h2066b-yellow-6mm-ring-crimp-pk-10/)
- Automotive Lug crimping tool
- Wire strippers
- Side cutters
- Replacement Batteries
- Soldering iron (Optional)
CAUTION: There is risk of shorting out the batteries during this process, ensure you take all precautions to prevent this, perform at your own risk.
Buying Replacement Batteries
I replaced the batteries with some out of a UPS that was a few years old, they still have plenty of usage left, but just not the high current load of the UPS they were in. In the end they were free effectively, so if they only last a year or two, that is fine.
If you need to purchase new batteries, they are 2 x 12v 18Ah SLA batteries in parallel, these are commonly available. Use a reputable brand, I recommend the CSB GP12170 model, these are heavy duty batteries, and you should get plenty of life out of them.
Here is a Link to the Battery Guru where you can purchase these from, a pair of these is the same as the APC UPS Battery pack RBC7: (https://batteryguru.com.au/product/apc-ups-rbc7-replacement-battery-2x-csb-gp12170-b1-terminal-2/)
Swapping out the batteries
The OEM batteries will be soldered in, so they aren’t totally straight forward to replace. A large industrial soldering iron was used, so instead of that we will use ring terminals instead.
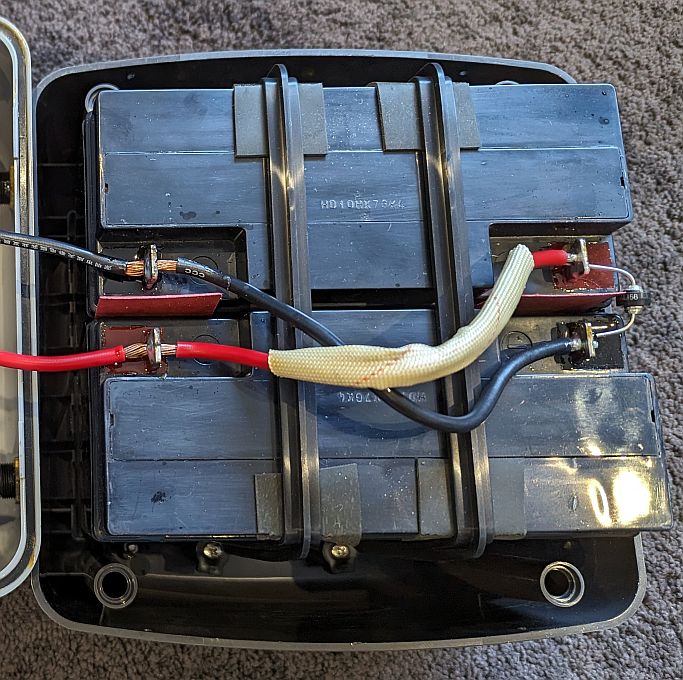
When cutting the wires, there are two things to consider before proceeding.
- Cut all the red or the black wires first, this way the risk of shorting anything out is reduced.
- Cut them as close to the battery terminals as possible, to maximumise the remaining wire length.
Once all cut, you will end up with the two long wires coming from the lid, and two separate red/black wires connecting the batteries together.
Removing the batteries
If you look down the side of the case, you will see two screws on each side, simply unscrew these and the batteries will come straight out.
NOTE: Before sure to follow your local requirements for recycling of old batteries
Battery installation
You will now need to prepare the wires with the 6mm ring lugs. This can all be done without the batteries, but please confirm they are suitable for your batteries as some may have different eye/screw sizes.
You will need 6 of the ring lugs, crimp them onto each end of the wires you now have. This is where ensuring you kept the wires as long as possible was critical!
NOTE: Instead of crimping you could also solder them in, this is shown in the below picture.
Place the batteries back in the bottom of the enclosure and screw them in. Ensure they are tight and won’t move around, using the original spacers providers under the straps as needed. If they are still moving around, you may need to add something else, they must not move around once screwed down tight.
If the straps are very loose, check they are sitting around the screw mounts at the bottom of the case properly.
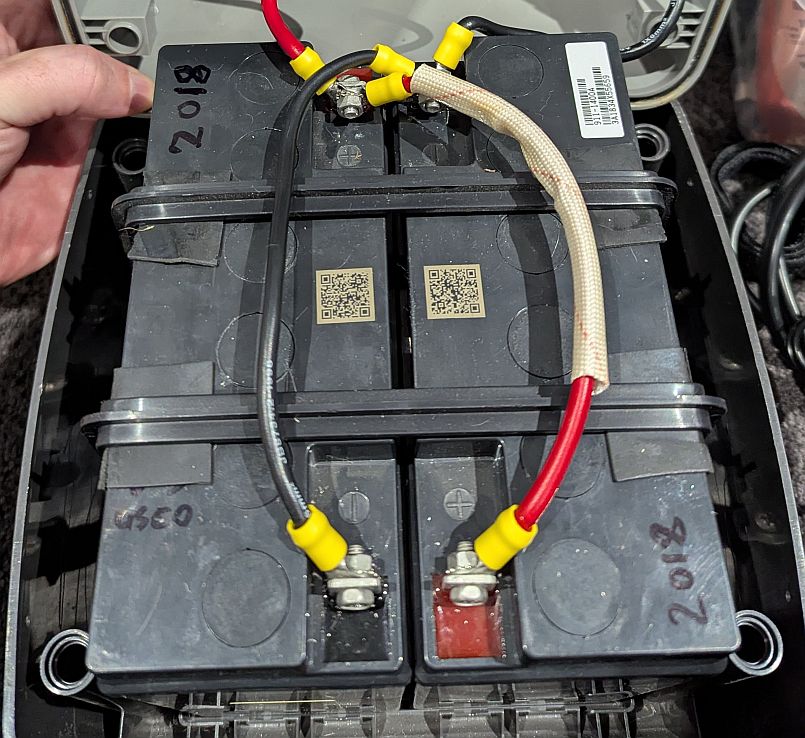
Connecting up the new batteries
Like when we removed them either do red or black first.
Connect the single end (the bottom of the above picture) first, then combine both the ring lugs on the screw, and attach to the other battery terminal. Tighten down, then repeat for the other colour. The second one is much more critical, if you are worried use some electrical tape or other insulator to cover the alternate terminals, it doesn’t take much to slip.
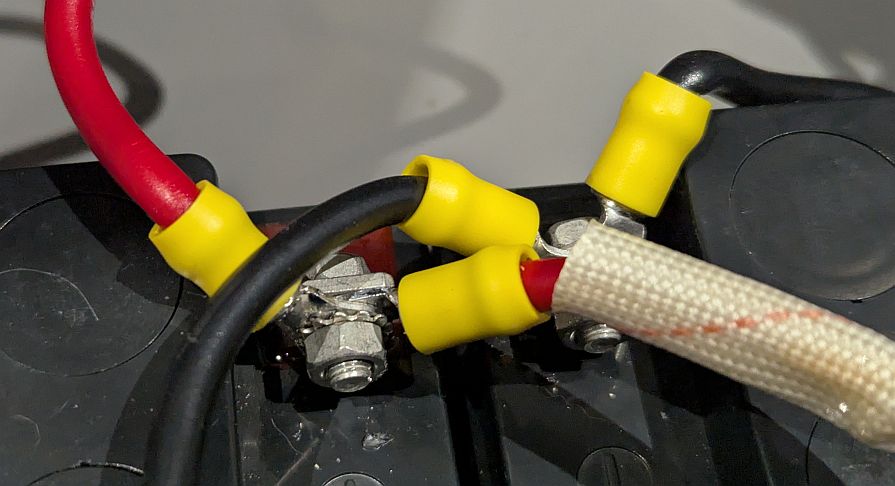
CAUTION: Due to how the batteries are installed, be careful to note the wires will criss-cross. The batteries are clearly marked with red and black for each terminal.
Double check all the screws are tightened down, and we are all complete. If you are not performing the other upgrades, proceed to the last section on Putting it all back together.
Installation of USB Sockets
What you will need:
- Stepped drill bit to suit hole size
- USB Socket with Power button (https://vi.aliexpress.com/item/1005003258307265.html)
- 2 x Red/Blue Automotive terminals (if they don’t come with the USB socket)
- Wire Strippers/side cutters
I don’t use the merit socket, as not many devices use this connector, despite actually being a better connector than the standard 12v cigarette lighter socket it never gained popularatory. So replacing this socket with some USB sockets just makes sense.
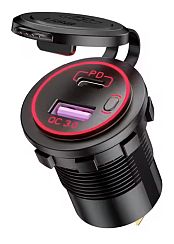
When selecting a USB socket, make sure it is one with a power button, as most do not have this, if you don’t, it will be drawing a small amount of current all the time, which will drain your battery when not in use.
To start the replacement, we need to remove the merit connector, de-solder or cut the wires as close as possible to the connector. IF you have the batteries connected up, be sure to wrap some electrical tape around both positive and negative wires.
Using your replacement USB socket measure the hole diameter and drill out
Drill out the Merit Connector to suit the USB socket diameter. Mount the USB socket, and firmly screw in. I removed the Weatherproof cover that comes with the socket, its up to you if you do or no.
Crimp down the terminals on the wires. Do one at a time, and attach to the USB socket once done, this will help prevent anything shorting out.
Now you are all done.

Putting it all back together
To put the case back together, with the bottom of the box upright hinge the lid back over the top, ensure it is sitting in the lip correctly.
Gently tip upside down, I have found trying to fix the top while it is upside down is harder than tipping it over and holding the lid in place, your luck may vary.
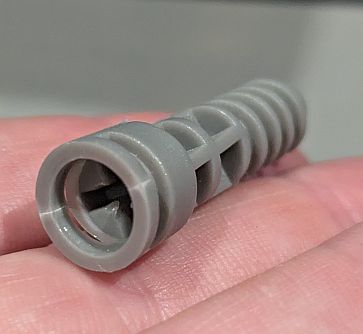
Grab the 4 grey screw-pegs that have probable tried to escape by now and place them in each of the holes.
Before tightening, put your screw driver down to the peg, but unscrew first, you will feel the screw driver drop when it finds the thread. Doing this prevents damage to the threads, as it uses the existing threads.
Make sure they are all tight, then return the battery box upright and check the lid doesn’t move around.
Job Done.
Anderson Charging or Power Supply Cables
What you need:
- 1 x GX19 2-pin Plug (or as many as you want) (https://vi.aliexpress.com/item/1005008556166904.html)
- Twin core wire (https://www.altronics.com.au/p/w4154-56-0.30-heavy-duty-automotive-figure-8-cable)
- Anderson PowerPole or other connection to suit your liking.
- Soldering Iron + Solder
- Wire Strippera/Side cutterst
- Multimeter
NOTE: There is no fuse on this port, so please make sure suitable fuses are used in what you plug into this mod.
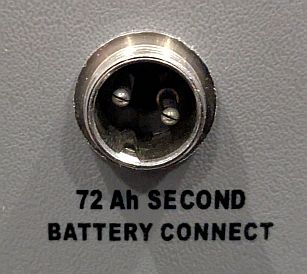
This modification uses the 72Ah second battery connector on the side of the Battery. Typically, this is unused, so this provides and easy upgrade without even opening the battery box. Despite saying 72Ah, this is battery capacity, not a current rating, I would recommend a maximum of about 20 Amps based on the wiring inside the box.
To add this option we just need to solder onto the GX19 plug, and attach our socket on the other end, I used Anderson PowerPoles, as these are most suited to the current rating, but you could also add a typical 50A Anderson plug as well, but please make sure you use suitable fusing to limit the current to a maximum of about 20 Amps.
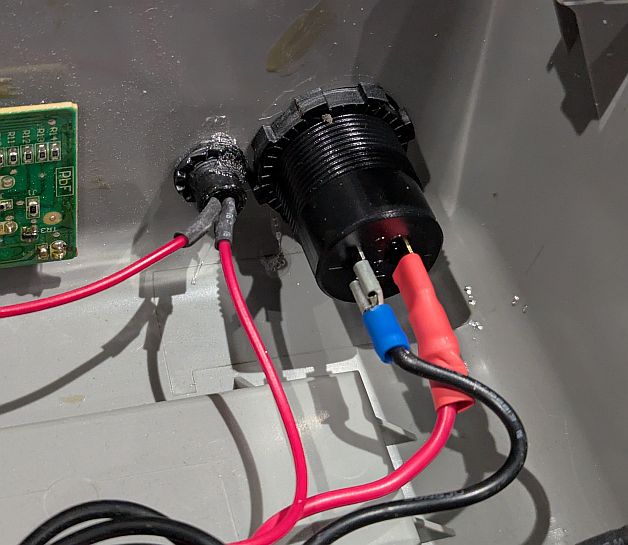
First of all the GX19 plug, a couple of quick notes:
- There is a little bronze grub screw under the screw to tighen the plug, this locks in the black part to the silver part, when removing it only needs a 1-2 turns, but it is VERY easy to loose, so make sure you are cautios when removing.
- There is a translucent plastic shield, this needs to be installed to ensure the soldering doesn’t short out on the shield when assembled, be share to install the shield and this piece BEFORE soldering on the wires.

To start, remove the grub screw and unscrew the silver shield. On the end of the shield, unscrw the two small screws, it doesn’t need to be all the way, but enough to ensure it will slide smoothly over your cable.
Next step is to install the shield and the translucent plastic piece on your cable, as per the picture below.
To Solder the wires, strip about 4mm back and place them into the solder points, you can separate these a little if needed with a small flat head screwdriver, but not too much.
On my plugs I found the terminal Labeled ‘1’ was the positive, but please doublecheck with a Multimeter.
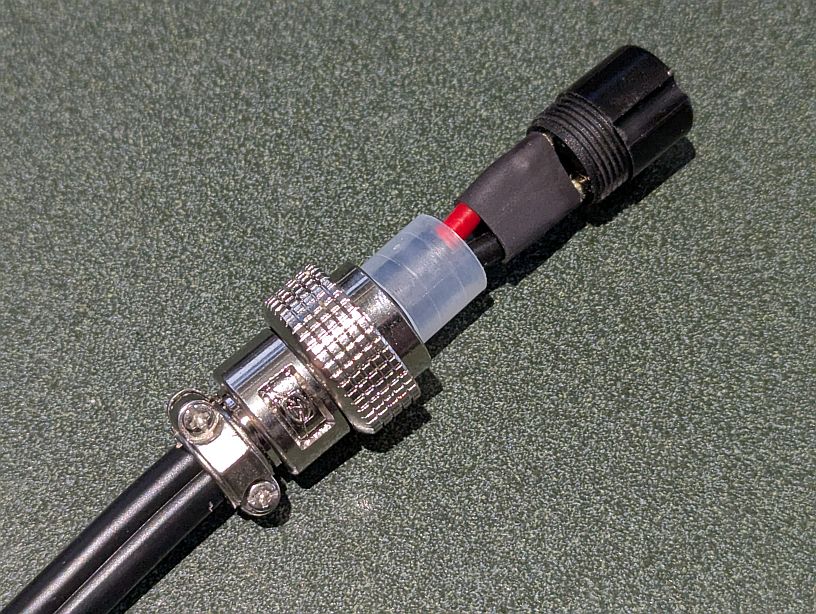
Solder in the wires, and I also used an extra piece of heatshrink, but this is optional. Heatshrink with a diameter of 16mm was perfect.
Screw on the shield over the plug, find the bronze grub screw and tighten it down, then tighten the screw to clamp onto the cable.
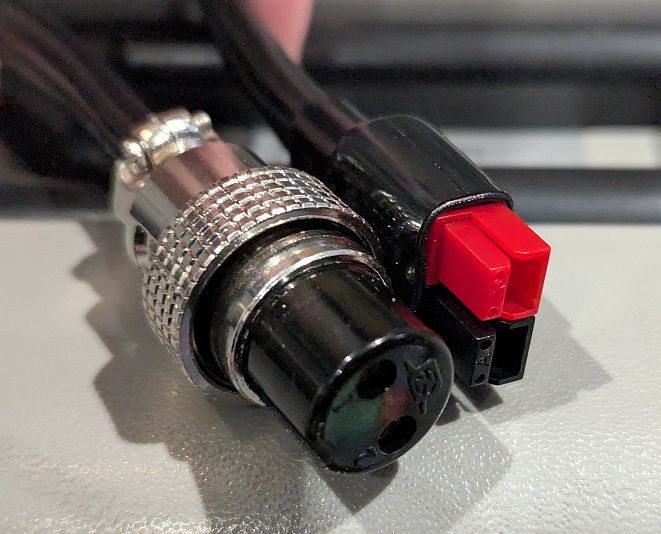
You can now attach what ever you need to the other end. I made one with Anderson PowerPole plugs, but you could also add another 12v Socket, or other devices as you need, paying attention to not overload the batterybox still, it isn’t made for high current applications.
Conclusion
Hopefully these few upgrades help with the usefulness of these batteries, or allows more life out of yours by replacing the batteries.
Happy Camping.